
I have observed the number of phishing events growing in the run up to Christmas. In part the growth is down to the wider availability of phishing kits and the adoption of quishing as means of bypassing security measures. In part the phishers are playing on the (classical) psychological aspects of Christmas and phishing– we are rushing more than normal to get things done (they play on the heightened state of urgency we place ourselves in) and we are in a more emotional less reasoned state (which deflects our thinking from questioning whether it’s a sensible or valid request).
Playing on this, in my experience, the phishers have seemingly ramped up their onslaught with the result that click through rates increasing (mass phishing is a numbers game). The tools behind the phish are frighteningly efficient with times from click to compromise measured in seconds. I have observed exfiltration occurring in less than 7 seconds after a successful quish with several bots ‘ganging up’ on the compromised account and sharing the credentials as well as the stolen data across the globe.
Security investigations are not part of my normal day job but as the volume increases and additional expertise has been sort, I have been drawn into the investigatory process. In doing so I have started to learn how to create Kusto queries which work with Microsoft Defender’s Advanced Hunting. The benefit of learning Kusto is that it is also used by Azure Data Explorer (so I learn two skills in one) and being read only it is non-destructive (which helps others trust me to use it 😊 ).
Summarised in this post are some of the queries I have learned to use as I investigate the initial breach. They are focused on key areas:
- What did they use
- Who else could be a victim
- Did they get in
- What did they access
The scenario is a common one. A colleague receives an email, they click on the link and unwittingly share their credentials. At that point, the phishing infrastructure swings into action and starts rifling through their emails as well as their content in SharePoint and OneDrive. Given the efficiency of the bots, it becomes a footrace to close the door and work out what has been seen, stolen or worse. I have written the rest of the post in the style of a playbook.
Prerequisites
Before proceeding with the investigation, it is recommended that you have the username, user principal name (UPN) or the email address of the account that you suspect is compromised. You can use Microsoft Entra ID (afka Azure Activity Directory) to gather additional technical properties associated with the user e.g. their ObjectID. If you do not have these properties, you can start with the email and work back to the compromised user.
It is assumed that you either have a sample of the phishing email, or parts of it like the sender’s address, subject of the email, or parts of the message to start the investigation.
Even if you have the actual email, I find it easier if I start by locating the email using Advanced Threat Hunting. That then makes the reuse of properties like the NetworkMessageId easier and you can also take actions directly from the console on the item as you go along.
Finally, query results are presented in your local time zone as per settings. Kusto filters, however, work in UTC.
#1 Letter from Bad Santa
Finding the suspect email
//Have to trial and error a little bit with known fragments e.g. delivery time, subject line
//Get the RecipientObjectId from AAD for the person
//Set the timestamp to period +/- the suspected delivery time
EmailEvents
| where RecipientObjectId == "xxxxxxxx-xxxx-xxxx-xxxx-xxxxxxxxxxxx" and
        Timestamp between (datetime(2023-12-01T09:00:00Z) ..datetime(2023-12-01T13:30:00Z)) and
        Subject contains "Completed: Complete "
The query uses three items from the Email Events table. The first of which is the compromised users ObjectID from Microsoft Entra ID. This is used as the RecipientObjectId in the query and can be obtained from their User profile.

The next item is the Timestamp which represents the period within which the suspect email was delivered to the victim. In terms of a time when the email was delivered, I tend to start a couple hours either side of the first sign of compromise in the sign in logs (more about those later) or the day the user reported clicking on it. Sometimes I have to work away from that point in time as a compromise is not always immediate and users’ memories can be (understandably) hazy. Hopefully along with the time you have a fragment say of the Subject or the Senders address.
The last item in the query is a fragment of the email subject line. If you do not have that, say as it was not reported and stored in quarantine, the Email Events table contains several other options including SenderMailFromDomain and InternetMessageId. Alternatively, you can take a slower path using a Purview Content Search or PowerShell. Microsoft’s phishing playbook describes both of these options but I’d argue that even with a couple of iterations a query is much faster when compared to a search or needing to run Exchange PowerShell… For example, in the time taken to connect to PowerShell you could have the result…
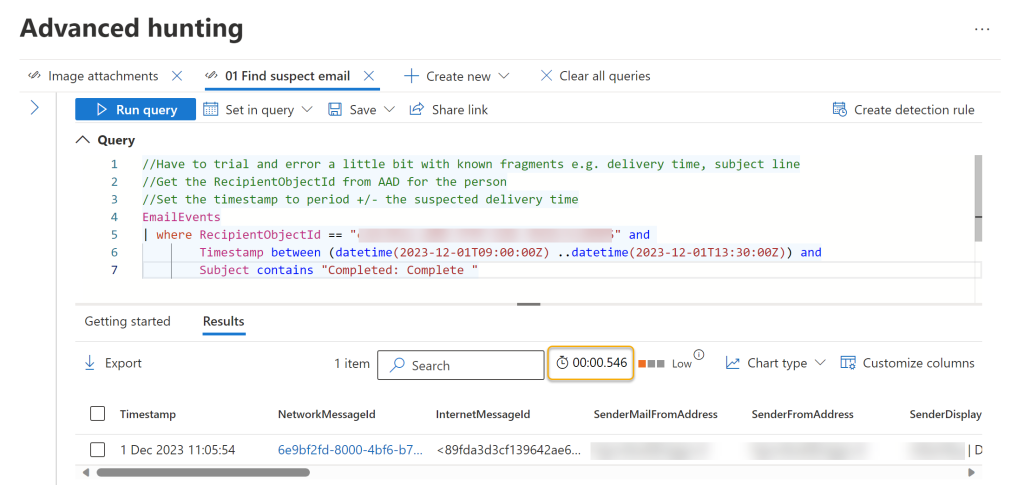
Once discovered, you can take immediate action on the email and gather additional information from the flyout (which can be activated by clicking on the requisite row). This includes whether the email contains links and attachments both of which you can follow up on as needed.

At this point you could pass the details into a MessageTrace or the Defender Explorer to extract the email for analysis. You can also link the results to an Incident in Defender or start the process of purging the email from other mailboxes.
#2 Santa’s Naughty or Nice List
Get the list of others who got the email
Unless it is a highly targeted spear phish there will be other potential victims of the same email. You could resort to a broad content search in Purview or use PowerShell to find them but be prepared for that to be slow.
//Find who else recieved it e.g. need to use a fragment part or all of the subject
EmailEvents
| where Subject startswith "Completed: Complete with DocuSign" and
 Timestamp >= ago(30d) //last 30 days
| order by Timestamp asc

Advanced hunting is fast and flexible and by tweaking the first query you can locate other instances of the email. This query looks for any email with the same Subject which has either been sent or received in the last 30-days using the ago() function.
This can be further refined, say to limit the results to where the email was received (EmailDirection equals Inbound) or not already acted upon by Defender or a Transport Rule e.g.
| where EmailDirection == @"Inbound"
| where OrgLevelAction != "Allow"
| where UserLevelAction != "Allow"
With an extra line, the results can be summarized into a distinct list of (potential) victims and optionally exported for further use.
//Find who else recieved it e.g. need to use a fragment part or all of the subject
EmailEvents
| where Subject startswith "Completed: Complete with DocuSign" and
 Timestamp >= ago(30d) //last 30 days
| distinct RecipientEmailAddress,RecipientObjectId

At this point you have a list of mailboxes and users for whom you can start removing the message and rotating their credentials as you should assume breach. The Microsoft playbook includes additional checks which can be performed at this time to check for signs of modifications, elevation and further distribution.
#3 How the Grinch Stole Christmas!
Did they act on the contents of the email?
One click or scanned QR code can be all it takes to let the Grinch in. As noted earlier, the query results reveal whether the email contained links and attachments. The UrlClickEvents table in the advanced hunting schema contains information about Safe Links clicks from email messages, Microsoft Teams, and Office 365 apps in supported desktop, mobile, and web apps.
//Have to trial and error as the click event could be closer to the sign in events. The only click could be the user reporting the phish...
//Comment out the NetworkMessageID to move the focus from the suspect email to all clicks in the period
UrlClickEvents
| where
        NetworkMessageId == "6e9bf2fd-8000-4bf6-b76a-08dbf25d78f8" and
        AccountUpn == "first.elf@santa.co.uk" and
        Timestamp between (datetime(2023-12-01T09:00:00Z) ..datetime(2023-12-01T13:30:00Z))
| where ActionType == "ClickAllowed" or IsClickedThrough !="0"

In particular, there are two items to examine:
- ActionType is “ClickAllowed” i.e. whether the click was allowed or blocked by Safe Links or blocked due to a tenant policy, for instance, from Tenant Allow Block list
- IsClickedThrough !=”0″ i.e. whether the user was able to click through to the original URL (1) or not (0)
If the user has clicked the link in the email (on-purpose or not), then this action typically leads to a new process creation on their device and other activities such as sign in events using their credentials.
// Explorer in Microsoft Defender can be used to review the acutal email and an attachment if one is present
EmailAttachmentInfo
| where Timestamp between (datetime(2023-12-01T09:00:00Z) ..datetime(2023-12-01T13:30:00Z)) and
        NetworkMessageId contains "6e9bf2fd-8000-4bf6-b76a-08dbf25d78f8" //from search 01

By querying the EmailAttachmentInfo table you can review the details associated with any attachments present in the email. This includes whether the attachment was scanned by Defender, the file name, size etc. These details can then be used to perform additional searches, say in SharePoint, to determine whether the file has been uploaded to a site.
#4 Did they get down the chimney?
Did they get in….?
Once opened it only takes a couple of seconds for the Grinch to ruin Christmas. In my experience it takes under 7 seconds from the initial click to data being compromised. Some of the bots behind the phishes are frighteningly fast, iterating through mailboxes and files at lightning speed stealing data or gathering proof of compromise for use at a later date. If the phish goes undetected then it is not long before the clock chimes four times and access is passed on or sold to others for more nefarious purposes.
Advanced hunting receives its data almost immediately after the sensors successfully collect it. For example, you can query event data from healthy sensors on workstations or domain controllers almost immediately after they are available on Defender for Endpoint and Defender for Identity. The AADSignInEventsBeta and IdentityLogonEvents tables include the authentication activities. The AADSignInEventsBeta is a temporary table which is being provided by Microsoft whilst AAD events are being transitioned to the IdentityLogonEvents table.
Using the details gathered from the email investigation it is possible to query the sign in events. In the example below I am looking for events where an interactive sign in event has been successful by using filters of ErrorCode equals 0 (successful) and LogonType equals ‘interactiveUser’.
AADSignInEventsBeta
| where AccountObjectId == "xxxxxxxx-xxxx-xxxx-xxxx-xxxxxxxxxxxx" and
        Timestamp between (datetime(2023-12-01T12:45:00Z) ..datetime(2023-12-01T13:30:00Z)) and
        LogonType == @"[""interactiveUser""]" and
        ErrorCode == 0
| order by Timestamp asc
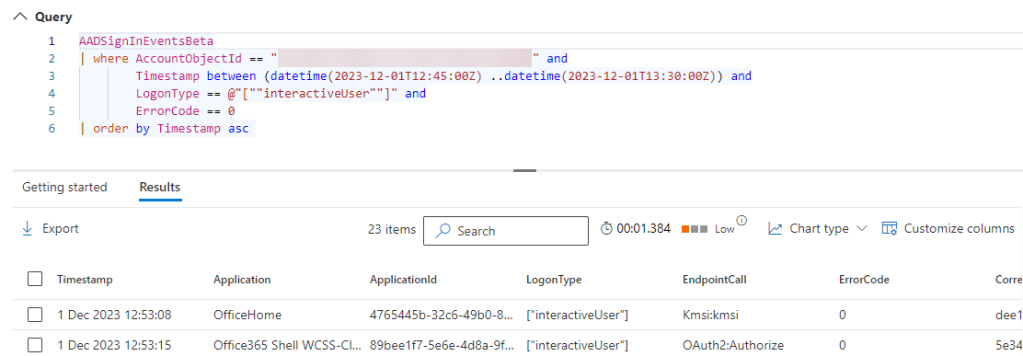
The data returned is also used in the Sign In and Audit views in Microsoft Entra ID and the Defender Activity log. With a couple of tweaks, it is possible to create summaries by IP or Country for investigation and action. As with the emails this includes the ability to link to incidents, narrow the scope and start closing the gate.
AADSignInEventsBeta
| where AccountObjectId == "xxxxxxxx-xxxx-xxxx-xxxx-xxxxxxxxxxx" and
        Timestamp between (datetime(2023-12-01T12:45:00Z) ..datetime(2023-12-01T13:30:00Z)) and
        LogonType == @"[""interactiveUser""]" and
        ErrorCode == 0
| summarize by IPAddress,Country,UserAgent,AuthenticationRequirement
| order by Country asc , IPAddress asc

Other changes include using the IP range or passing the details of other suspected victims as the search criteria to detect other connections.
Kusto wrapping tip – arrays and joins
When using long arrays of information is it often easier to define them in a let statement and then call them in the query. Joins allow you to combine results from tables.

The example above queries the EmailAttachmentInfo table for images received in a specific period of time where we were looking for similar quishing events. It uses a let statement to define a set of domains which we considered safe at the time together with a list of target file extensions. The results are then joined using their NetworkMessageIds to the corresponding entry in the EmailEvents table.
#5 Labelling the gifts
Time to work out what’s been viewed or worse
Given the speed at which the attacker can get a foothold it is inevitable that data loss will occur. By querying the CloudAppEvents table it is possible to summarise the content which has been accessed. As with the other queries this can be pivoted by properties like IP Address, Country, Users and action taken directly from the results.
CloudAppEvents
|   where   AccountObjectId == "xxxxxxxx-xxxx-xxxx-xxxx-xxxxxxxxxxx" and
            Application has_any ("Microsoft SharePoint Online","Microsoft OneDrive for Business") and
            Timestamp between (datetime(2023-12-01T12:50:00Z) ..datetime(2023-12-01T13:30:00Z)) and
            CountryCode has_any ("RU","SE") //Update for target countries comma separated
|   summarize Count = count() by ObjectName,CountryCode,IPAddress,ActionType
|   order by Count desc

In the above example I am searching SharePoint and OneDrive for the activities of a particular user in a specific period of time and then summarising by the number of times an activity has occurred. As an aside I’ve found that preview events which occur immediately after a sign in are typically generated by the attacker landing on the office.com homepage as a result of the login redirect. As such they are probably not genuine previews. The results can be used in the next stages of the clean up e.g. exposure of commercially sensitive or personally identifiable data.
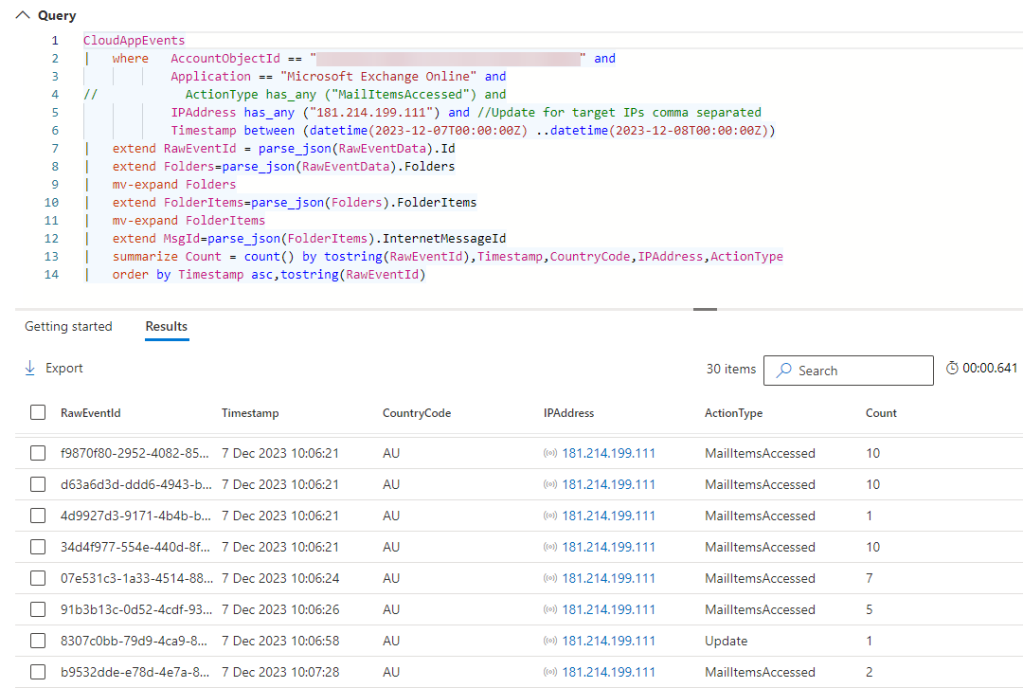
The CloudAppsEvents table is particularly useful when it comes to extracting the unique MessageIDs associated with a compromise. It is possible to gather them either manually (which is super painful) or programmatically (which uses PowerShell and takes time). In the example below I am focussing on access events from a specific country (AU Australia), for a specific account, for a given day and simply listing out the unique MessageIDs for use with a PowerShell query will gather up each email for forensic review. In under 10s I have a list of 193 emails to look at. Compare that to the time required to execute a similar query in Purview…
CloudAppEvents
|   where   AccountObjectId == "ca4cd5ea-a88b-4745-b28c-01b6c3ce0405" and
            Application == "Microsoft Exchange Online" and
            ActionType has_any ("MailItemsAccessed") and //Update for target actions
            IPAddress has_any ("181.214.199.111") and //Update for target IPs comma separated
            Timestamp between (datetime(2023-12-07T00:00:00Z) ..datetime(2023-12-08T00:00:00Z))
|   extend Folders=parse_json(RawEventData).Folders
|   mv-expand Folders
|   extend FolderItems=parse_json(Folders).FolderItems
|   mv-expand FolderItems
|   extend MsgId=parse_json(FolderItems).InternetMessageId
|   project  MsgId
|   where MsgId !=''
|   distinct tostring(MsgId)

You’ll notice the use of the mv-expand operator in the above example. It is being used to progressively unpack the nested json within each of the audit records. Each step traverses deeper into the record and I find it easier to clearly unpack each step rather than combining into one. The query ends with a project operator which drops all of the columns from the table except for the one I am interested in. I then perform a distinct operation to get the final list.
#6 Mince pies and mulled wine
Wrapping it all up
Hopefully you found this post useful. Through using advanced threat hunting queries, you can reduce your response time to a compromise event as many of the queries will resolve within seconds. You can then follow up with slower compliance based searches. As a bonus gift, you can save queries so they are ready for use and share them with your colleagues so they can use them. If this is your first encounter with Kusto and advanced hunting, the query explorer includes an experience that can guide you through the creation of queries from scratch. Alternatively, you can dive right in and use the schema explorer as you go. I’ll wrap up with these useful links:
Hopefully you are now better prepared if the Grinch tries to phish Christmas.
[The header image and those below were created using Bing Chat Enterprise and the prompt “create a picture of the grinch being phished”.]


